SnapRAID 14.X and the New SnapRAID Daemon: A First Look
If you’ve been following this blog for a while, you know SnapRAID is central to my homelab storage setup. I’ve been running it for years on top of MergerFS to protect my media array, and I even maintain a SnapRAID sync script that a lot of you have been using. So when SnapRAID 14.1 dropped alongside the brand-new SnapRAID Daemon, I had to check it out.
What’s New in 14.X?
SnapRAID 14.X is a significant release, and the biggest reason it exists is to lay the groundwork for the new daemon — but it also brings some genuinely useful CLI improvements on its own.
The headline additions:
.snapraidignoresupport — You can now drop a.snapraidignorefile directly inside subdirectories of your array to exclude files at the folder level, similar to how.gitignoreworks. No more cluttering your global config with one-off exclusion patterns.**glob support — Recursive pattern matching across multiple directory levels is now supported in exclusion rules.- New
locatecommand — Maps physical file offsets within the parity volume. Mostly a diagnostic tool, but handy if you’re ever doing deep analysis of parity distribution. - Decimal scrub percentages — The
-p/--planoption now accepts decimal values like-p 1.5or-p 0.2, giving you finer control over incremental scrubs. - New
probecommand — Shows the spinning status of all disks, which pairs nicely with the spin-down awareness in the daemon. -s/--spin-down-on-error— Spins down all disks automatically when a command ends with an error.-A/--stats— Extended process statistics view.- Wear level in SMART reports — The SMART output now includes wear level percentage, useful for keeping tabs on SSDs used as cache or content drives.
- Better
smartctldetection — Improved reliability when running under sudo or in environments where/sbinand/usr/sbinaren’t inPATH. - More log tags — Expanded structured log output across all commands, which is what makes the daemon integration possible.
Note: SnapRAID CLI 14.0 is the minimum required version to use the daemon. If you’re planning to try the daemon, upgrade first.
Building from Source
I’ve always compiled SnapRAID from source, so let’s keep that trend up. It’s straightforward:
1
2
3
4
5
6
7
8
9
wget https://github.com/amadvance/snapraid/releases/download/v14.9/snapraid-14.9.tar.gz
tar xzvf snapraid-14.9.tar.gz
cd snapraid-14.9
./configure
make -j"$(nproc)"
make check
make install
cd ..
rm -rf snapraid-14.9*
The make check step runs the test suite — worth doing. The whole thing takes a few minutes on modern hardware.
The SnapRAID Daemon: Moving Beyond Cron Jobs
This is the big one. If you’ve been running SnapRAID with a cron-based sync script (like mine), the daemon is essentially a more sophisticated, always-on replacement for that workflow.
The daemon (snapraidd) runs as a background systemd service and takes over the full lifecycle of SnapRAID operations: up, diff, sync, and scrub — all on a custom schedule you define. It also adds capabilities that were never practical with cron alone:
- Safety Freeze — If the daemon detects a massive accidental deletion (exceeding your configured threshold), it freezes the sync immediately, protecting your parity from reflecting the disaster until you review and intervene.
- SMART monitoring — Integrated disk health monitoring with temperature limits. You can set a
temp_limitin the config, and the daemon will spin down disks and halt operations if they get too hot. - Spin-down awareness — The daemon is smart enough not to wake sleeping disks just for routine health probes.
- Multi-channel notifications — Supports ntfy.sh webhooks, email, or system logs.
- REST API — Full HTTP API backend, so you can integrate with Home Assistant, custom scripts, or whatever you want.
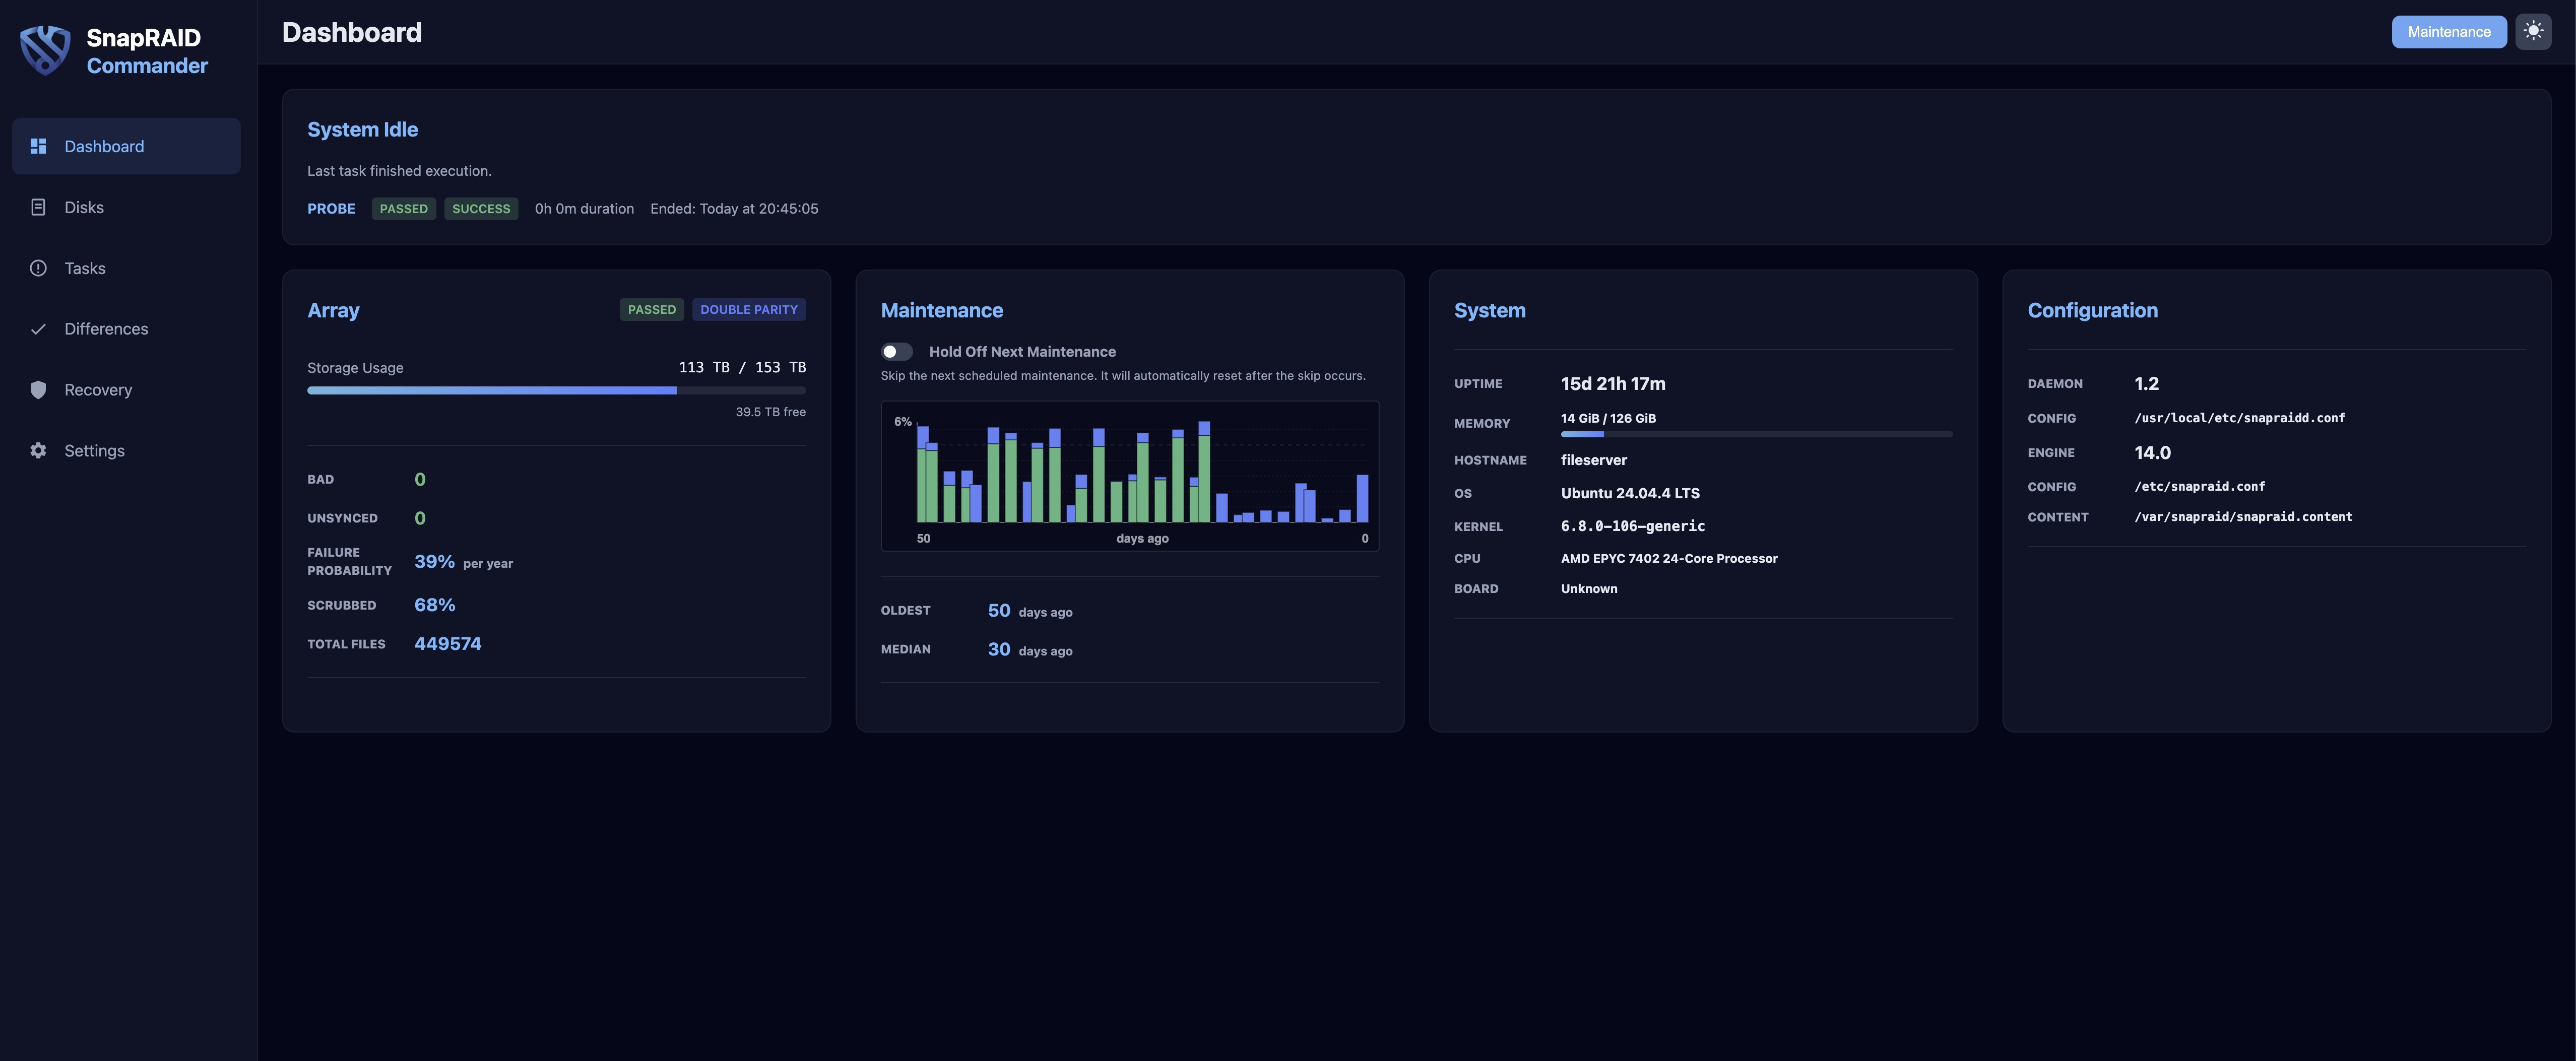
- Built-in Web UI — A browser-based dashboard served natively by the daemon. No extra web server needed.
Installing the Daemon
Same approach — compile from the tarball:
1
2
3
4
5
6
7
8
9
10
11
12
wget https://github.com/amadvance/snapraid-daemon/releases/download/v1.14/snapraid-daemon-1.14.tar.gz
tar xzvf snapraid-daemon-1.14.tar.gz
cd snapraid-daemon-1.14/
./configure
make -j"$(nproc)"
make check
make install
cd ..
rm -rf snapraid-daemon-1.14*
systemctl daemon-reload
systemctl enable --now snapraidd
systemctl status snapraidd
Initial Configuration
The daemon config lives at /usr/local/etc/snapraidd.conf. Here are the key options I changed to get it accessible on my LAN for initial testing:
1
2
3
4
5
6
7
8
# Listen on localhost and the host's LAN IP
net_port = 127.0.0.1:7627,192.168.172.10:7627

# Allow access from my Wireguard subnet and local LAN
net_acl = +10.0.0.0/8,+192.168.172.0/24

# Enable full config access from the web interface
net_config_full_access = 1
After editing, restart the service:
1
systemctl restart snapraidd.service
You can verify it’s working by browsing to http://<your-host-ip>:7627/ directly before putting it behind a reverse proxy.
Putting It Behind Traefik
Running it directly on port 7627 is fine for testing, but I wanted it behind Traefik with proper SSL like the rest of my services. There are a few gotchas to be aware of.
DNS and Certificate
I created an A record in Cloudflare pointing snapraid.vpn.zackreed.me to my WAN IP with the proxy disabled (grey cloud, DNS-only). This is important, Cloudflare proxying doesn’t play well with VPN-internal services, and the DNS-01 challenge requires DNS-only to work correctly.
If you hit a certificate error like:
1
2
acme: error presenting token: cloudflare: failed to create TXT record:
[status code 400] 81058: An identical record already exists.
That’s a stale _acme-challenge TXT record from a previous failed attempt. Go into Cloudflare DNS, delete it, and restart Traefik.
Traefik Dynamic Config
Create a new file, e.g. /your/traefik/config/snapraid.yml:
1
2
3
4
5
6
7
8
9
10
11
12
13
14
15
16
17
18
19
http:
  routers:
    snapraid:
      rule: Host(`snapraid.vpn.zackreed.me`)
      entryPoints:
        - websecure
      tls:
        certResolver: le
      priority: 100
      middlewares:
        - lanOrVpnOnly@file
        - securityHeaders@file
      service: snapraid

  services:
    snapraid:
      loadBalancer:
        servers:
          - url: "http://192.168.172.10:7627"
A couple of things worth noting here:
- Use the host’s LAN IP, not
127.0.0.1— If Traefik is running in Docker,127.0.0.1resolves to the container, not the host. The daemon won’t be reachable. - Use the LAN IP in the service URL even though the daemon is on the same host — same reason.
ACL Gotcha: Docker Bridge Network
This one bit me. The daemon’s net_acl blocks connections by source IP. When Traefik runs in Docker, requests arrive at the daemon from the Docker bridge network IP (something like 172.18.x.x), not your LAN IP. The daemon will silently drop them and you’ll get a bad gateway.
You can confirm this by checking the daemon logs:
1
journalctl -fu snapraidd
You’ll see lines like:
1
civetweb internal: accept_new_connection: 172.18.0.5 is not allowed to connect
Fix it by adding your Docker bridge subnet to net_acl. Check which subnet your Traefik network uses first:
1
docker network inspect proxy | grep Subnet
Then update the config:
1
net_acl = +10.0.0.0/8,+192.168.172.0/24,+172.18.0.0/16
Restart the daemon to pick up the change:
1
systemctl restart snapraidd
Disable the Daemon’s Built-in Security Headers
Since Traefik is already adding security headers via securityHeaders@file, turn off the daemon’s own headers to avoid conflicts:
1
net_security_headers = 0
After all config changes, do a full restart (not just reload) to make sure everything is applied cleanly:
1
systemctl restart snapraidd
Setting Up Gmail Notifications
The daemon can send email reports via curl’s built-in SMTP engine, which is clean because your credentials never touch the command line or logs.
1. Create a Gmail App Password
Since you likely have 2FA enabled on your Google account, you’ll need an app password rather than your regular password. Head to myaccount.google.com/apppasswords, create one (I called mine “snapraidd”), and save the 16-character password.
2. Create the .netrc File
The daemon runs notifications as root by default, so the .netrc goes in root’s home directory:
1
nano /root/.netrc
1
2
3
machine smtp.gmail.com
login your_email@gmail.com
password abcdefghijklmnop
NOTE: make sure that your password is formatted like this password abcdefghijklmnop not with spaces like this password abcd efgh ijkl mnop
Lock down the permissions or curl will refuse to use it if it’s wrong!
1
chmod 600 /root/.netrc
3. Configure notify_result in the Daemon Config
Uncomment and fill in the curl line:
1
notify_result = curl --netrc --url smtps://smtp.gmail.com:465 --ssl-reqd --mail-from your_email@gmail.com --mail-rcpt your_email@gmail.com --upload-file -
And set your notification threshold. I went with info to get a routine email after every successful sync while I try this out:
1
notify_result_level = info
NOTE: Finally, make sure you change it to run as root instead of as nobody.
4. Pause and Unpasue Docker Containers During Sync
If your arr stack (Sonarr, Radarr, etc.) is running on the same host and writing to the same MergerFS pool that SnapRAID is protecting, you’ll want to pause those containers during sync. This prevents any mid-sync writes that could cause inconsistencies in your parity data.
The daemon’s hook system makes this straightforward. It calls a script at three points in the task lifecycle:
task-begin— before the daemon starts accessing the arraytask-end— after the task completes successfullytask-error— if the task is interrupted or fails
Create the Hook Script
Create the script directory and file:
1
2
mkdir -p /root/scripts/snapraid
nano /root/scripts/snapraid/snapraid-hooks.sh
1
2
3
4
5
6
7
8
9
10
#!/bin/bash

case "$1" in
  task-begin)
    docker pause sonarr radarr lidarr sabnzbd
    ;;
  task-end|task-error)
    docker unpause sonarr radarr lidarr sabnzbd
    ;;
esac
Adjust the container names to match your setup. You can get the exact names with:
1
docker ps --format ''
The task-error case is just as important as task-end. It’s there so that if the daemon hits an error mid-task, your containers will still unpause. Without it, you’d come back in the morning to a paused arr stack.
Next, let’s set the right permissions. The daemon requires the script to be owned by root and not world-writable:
1
2
chmod 700 /root/scripts/snapraid/snapraid-hooks.sh
chown root:root /root/scripts/snapraid/snapraid-hooks.sh
Wire It Up in the Daemon Config
Open /usr/local/etc/snapraidd.conf and set the following:
1
2
hook_script = /root/scripts/snapraid/snapraid-hooks.sh
hook_run_as_user = root
NOTE: Or, set these values in the web interface.
The hook_run_as_user = root is required here since the docker CLI needs access to /var/run/docker.sock. The default of nobody won’t work for Docker commands.
Restart the daemon to apply:
1
systemctl restart snapraidd
Verify It’s Working
Watch the logs during the next sync to confirm the hook is firing:
1
journalctl -fu snapraidd
You should see the task-begin and task-end events in the log, and you can verify containers are actually pausing with:
1
docker ps --format '\t'
Paused containers will show Up X hours (Paused) in the status column.
That should be it! If you have other ideas to make this daemon better, or if you hit snags, create an issue on Andrea’s github page.
What About My SnapRAID Sync Script?
The daemon largely replaces what my sync script does: scheduled syncs, diff checking, email notifications. That said, if you’re not ready to make the jump, the script still works fine with SnapRAID 14.0. The CLI interface hasn’t changed in any breaking way.
Final Thoughts
SnapRAID 14.0 + the daemon is a meaningful step forward. The CLI improvements are solid on their own, but the daemon is what makes this feel like a modern storage tool rather than a collection of shell scripts held together with cron. The Safety Freeze alone is worth it if you make sweeping changes.
If you’ve been putting off trying SnapRAID because the manual cron workflow felt too hacky, this is a good time to revisit it.
Have questions about the setup? Drop them in the comments below. And if you’re still using my sync script and hitting issues with 14.x, let me know, I’m happy to take a look.